EchoLink® software allows licensed Amateur Radio stations to communicate with one another over the Internet, using streaming-audio technology. The program allows worldwide connections between stations or from computer to station, greatly enhancing Amateur Radio’s communications capabilities. There are more than 350,000 validated users worldwide — in 159 of the world’s 193 nations — with about 6,000 online at any given time. The program runs on Microsoft Windows®, with editions also available for Android and iOS. It is offered free of charge and may be downloaded here.
Website –
Validation
EchoLink opens a world of new communications possibilities by joining Amateur Radio stations over the Internet. Since the Internet is a shared, public resource, security is naturally a very important part of the system.
Each new user of EchoLink must provide proof of license before access is granted. This is to ensure that only licensed Amateurs have access to the system and to ensure that each user is using a valid callsign that they are authorized to use.
There are several different ways you can provide proof of license. These options vary somewhat by country. You can do this after installing your software (note: it may take a day or two to get validated).
Installing-
● YouTube Video – “Installing & Setting Up EchoLink on PC”
● Basic instructions
a. Download and install software to your PC or Phone
b. Choose User mode (NOT Sysop mode)
c. Configure software
d. You’ll be asked to enter some information about your station.
- Callsign: Set the callsign exactly as you wish to be registered with EchoLink. If you have already registered, use the same callsign you used previously.
- Password: If you had used EchoLink previously, type your original password here. Otherwise, select a password you can easily remember, and it will be assigned to you as you register. Be sure to make a note of it in case you need to re-install the software.
■ First Name: This name will appear on the other station’s screen when you establish contact. Enter the name by which you wish to be called.
■ Location: Enter the location of your station or a description of its function. This will appear in the list of available users. Example: “Akron, OH”
■ Email Address: Please enter your e-mail address. This address is used only for initial registration and will not be published or displayed anywhere. After registration, please use the EchoLink Web site to inform us of any change in your e-mail address.
■ Region: You will be asked to indicate in which general region of the world you are located.
e. Configure your microphone and speakers
f. Callsign Validation: If you have never used EchoLink before, the callsign you entered will need to be validated by the system before you will be able to access it.
To gain access, you must provide proof of license to the EchoLink system; for details, please see the Validation section of the EchoLink Web site. Until the callsign has been validated, the Station List area of the screen will be blank or may display a message indicating that your callsign is not yet validated. Once validation is complete, you will see the list of stations appear in the Station List area, and you can proceed to use EchoLink.
Using-
- Connecting to a Station
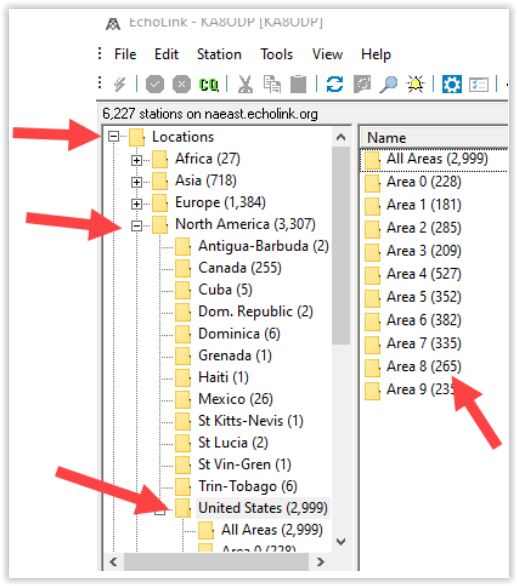
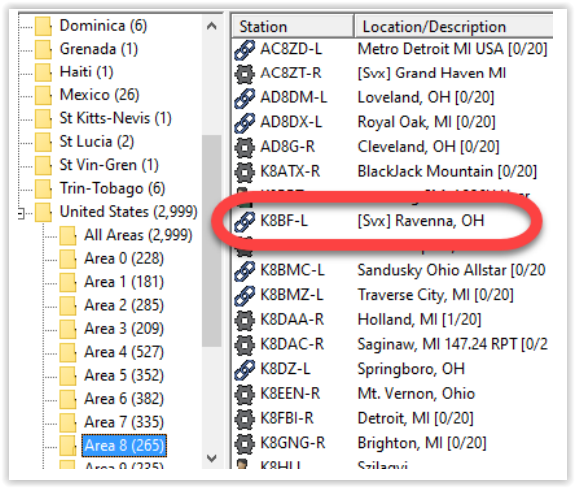
- To connect to another station, find the station’s callsign in the Station List. Use the tabs at the bottom to select either Index View or Explorer View, depending on your preference. (NOTE for Ohio Section Youth Net go to North America, United States, Area 8. Then choose “K8BF-L [Svx] Ravenna, OH”)
- Once you’ve located the station you’re looking for, double-click on the station’s callsign to connect to it. After a few seconds, you should see the station’s callsign and name appear near the bottom of the screen, and you should hear the “connected” signal. You are now in direct contact with the other station and you can begin conversing.
- c. If, after about 30 seconds, you see the message “Timed out,” it means that the attempt to connect to the other station failed (troubleshooting).
- Speaking Back and Forth
- Once connected, you can converse with the remote station as in an ordinary QSO.
- The space bar works as a locking “push-to-talk” switch.
■ Tap the spacebar once to begin “transmitting,” tap it again to stop (don’t hold it down).
■ A red TX indicator appears on the screen whenever EchoLink is “transmitting,” that is, sending audio over the Internet to the connected station.
- If you prefer, you can click the lightning bolt icon near the upper left corner of the screen instead of using the spacebar. You can also change the software so that the spacebar is held down to transmit and released to receive, more like a push-to-talk switch. See Preferences for details.
- You can switch to Transmit only when the other station is not already transmitting. When the other station is transmitting, the letters RX appear in the status bar at the bottom right, and the sound-level meter moves from left to right to show incoming sound. If you see that the other station is speaking, but you do not hear audio from your PC speakers, you may need to increase the volume on your sound device. Click the loudspeaker icon near the bottom right-hand corner of your Windows screen to adjust. Also, be sure the volume knob on your speakers is turned up.
- While transmitting, speak into the microphone and watch the sound-level meter at the bottom-center of the EchoLink screen. The meter moves farther to the right as the sound gets louder. For best results, adjust your Windows Recording Volume settings so that the meter moves vigorously but does not reach full-scale except on peaks.
- If you see the red TX indicator while transmitting, but see no indication on the sound-level meter while speaking into the microphone, see Sound Card Issues for more information.
- Disconnecting
- Once your conversation is finished, click on the red “broken link” icon near the top of the screen to disconnect. You should hear the “Disconnected” signal and see the message “Not connected” near the bottom of the screen.